Quantcast
Channel: Specops Software Deployment Blog
Viewing all 75 articles
Browse latest View live

PowerShell 002

$
0
0

Test-Connection

Another day-in-the-lifetype post. We have all been there; systems engineers, developers, hobbyists, tinkers or the like finding ourselves troubleshooting network issues. And the first thing we do? Anyone? PING. Right? We all head to PING or IPConfig or some basic tool and we ‘PING’ something to begin figuring out why we can’t connect or why our connection is wonky. Yes, ‘wonky’ is a real word and completely acceptable.

OK, but wait. PING? Isn’t that a command my Grandfather taught me? That is so old school. I’m modern, cool, wicked smaht (as we say in Boston), there has to be something better than PING; PathPing? Tracert? Not bad. Interesting command line tools, but still old-school. I want PowerShell, how can I do this in PowerShell?


Get-Help

I will try to use this as a theme. Introduce a bit about the PowerShell help system in every post. It is so very cool and well worth the time. ‘Teach a man to fish’ and all that!
So the goal here is to navigate through and look at issue with your network connection. Open  the PowerShell ISE or Console, your choice (choose ISE) and enter:
PS C:\> get-helpnetwork

Hit Enter and you will get a list of far too many options. OK, time to narrow down. How about:
PS C:\> get-helpconnection

Still too many results. VPNClient stuff, SMBShare stuff, Hyper-V, lots of interesting things but not what I want. Wait, I can use wildcards can’t I? Wildcards are your savior when trying to figure out things in PowerShell. Enter this:
PS C:\> get-help*connect*

The list is still  long but take a look at some of the info in the ‘synopsis’ column. A quick scan and you will see  “…ICMP echo… blah blah” that sounds an awful lot like PING. Let’s check it out. The cmdlet is called Test-Connection. Now go to the source, type the following and read through the output.
PS C:\> Get-HelpTest-Connection-Full

Take a look at the –ComputerName parameter. The syntax of the parameter looks like this:
-ComputerName <String[]>

The square after String tell you that you can have multiple inputs, separated by a comma so this will work great!
PS C:\> Test-Connection-ComputerNamesrv1,file01 

Test-Connection

The  benefit to this cmdlet over PING is that it is machine independent. It can  work with multiple machines at a time and provide heuristics about connections between two remote hosts. From the Help file you can see all of the available parameters, and since you used the –Full switch, some practical examples of how to use the cmdlet are shown at the bottom.
Let’s keep this introduction to Test-Connection simple. We will only cover a few of the parameters, -ComputerName, -Count and –Source.

-ComputerName

This is a positional parameter and it is required. This means you must state what host you wish to test with (I almost said PING <g>), but if you place the computer name immediately after Test-Connection,you do not need to specify the parameter name. For a best practice leave it in there. It makes reading PS info much easier later as you begin sharing with colleagues, friends, family and whoever is still listening to you J. These two statements are the same:
PS C:\> Test-Connection-ComputerNamesrv1
PS C:\> Test-Connectionsrv1

If you need to test the connection to multiple machines at a time. separate the machines names with a comma.
PS C:\> Test-Connection-ComputerNamesrv1,file01

-Count

This switch  tells the cmdlet how many echo requests to send. Similar to PING it defaults to 4 but if you are looking at a connection and need to keep it going as you do something you can crank this up.
PS C:\> Test-Connection-ComputerNamesrv1-Count10

-Source

This one IMO is very powerful. This allows you to sit at your computer and  test a connection between two remote systems. Imagine you are troubleshooting an n tiered app and some performance issues. You can use this to quickly determine ICMP issues or network latency issues between any two nodes in your application design. Finding where a slowness is occurring can help you narrow down where to dig deeper.

PS C:\> Test-Connection-ComputerNamesrv1,file01-Count5-Sourcedc1

This cmdlet with PING srv1 and file01 5 times from dc1.

Source Destination IPV4Address    IPV6Address Bytes Time(ms)
------ ----------- -----------    ----------- ----- --------
DC1    file01      192.168.137.1              32    0      
DC1    srv1        192.168.137.11             32    0      
DC1    file01      192.168.137.1              32    0      
DC1    srv1        192.168.137.11             32    0      
DC1    file01      192.168.137.1              32    0      
DC1    srv1        192.168.137.11             32    0      


Look deeper into the help files, if you are into WMI and building really powerful scripts and automation, this cmdlet returns a WMI object called Win32_PingStatus object that you can use for some amazing things. 

Kevin Sullivan, Director of Sales Engineering

NIC Configuration Error

$
0
0
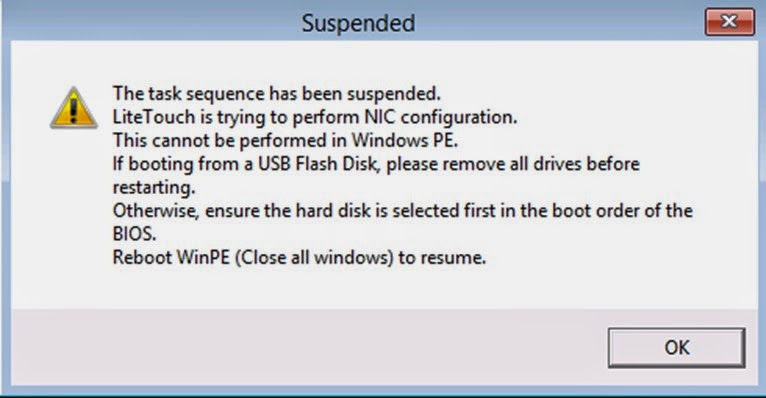
Recently, I redeployed a few laptops with Specops Deploy and after boot up I got the following error: 


Once I hit OK, the computer rebooted into the same error. This unusual error is caused by the system booting into an operating system (WinPE) that it didn’t expect, instead of the operating system that is already installed on the client machine. This error is most common when an install was not complete and the client machine was pre-staged to start a fresh operating system installation.
 
The easiest way to troubleshoot this error is to format the hard drive completely. Please note that you will lose all of the information on the disk. To do this:
  • Hit F8 at the error message to bring up the command prompt.
  • Type diskpart
  • Type Select disk 0
  • Type clean   
  • Hit Enter
Once you format the hard drive you will need to reboot the client machine and start the deployment again. More information about this particular error along with other fixes can be found in this link: 

Happy Deployments!


Heather Pacan, Product Specialist

Error connecting to deployment share after upgrading to Deploy 5.0

$
0
0
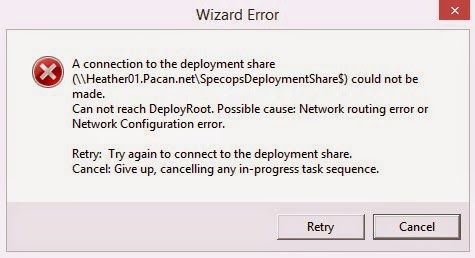
I recently upgraded my home environment to Deploy 5.0 to take advantage of deploying Windows 8.1 clients. If you are a Deploy customer that has already done this, you already know that you need to upgrade Microsoft Deployment Tool Kit from 2012 Update 1 to 2013. In an effort to save time, I did an in place upgrade of MDT. After upgrading the rest of the components, I thought I was good to go until I PXE booted my laptop, and got the following error:


I double checked all of my components and could not figure out what was wrong. I spoke with my colleague Johan, and the first question he asked me was did you do a fresh install of MDT 2013 or did you just upgrade in place? He pointed out that if you do an in-place upgrade, you may be missing a couple of registry keys to disable strict name checking and loopback check. The work around is to do this manually. 

Create the following DWORD values in the registry of your Deploy Server:
HKEY_LOCAL_MACHINE\SYSTEM\CurrentControlSet\Services\lanmanserver\parametersCreate a DWORD value DisableStrictNameChecking and set it to 1.

HKEY_LOCAL_MACHINE\SYSTEM\CurrentControlSet\Control\LsaCreate a DWORD value DisableLoopBack and set it to 1.

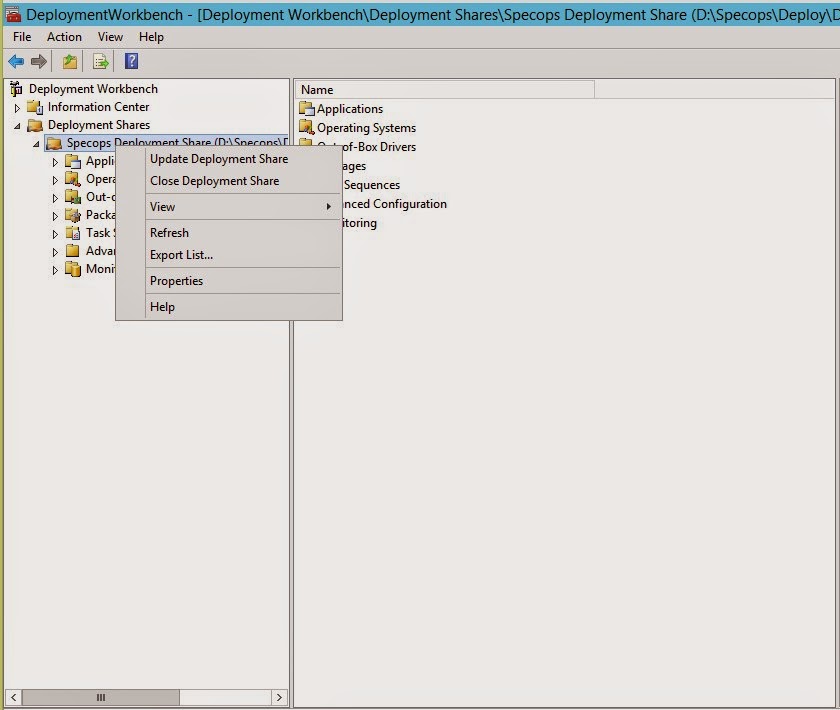
After making the registry changes, reboot your deployment server so that they can take effect. Another alternative would be to update your deployment shares through the MDT workbench. When you open the workbench after upgrading to MDT 2013 you will see an exclamation point on your deployment share indicating that it needs to be updated. You can simply do this by right clicking on the deployment share and selecting Update Deployment Share and going through the wizard.


Once you have made one of these two changes, you can reboot the client machine that you were deploying an operating system to and you should be able to connect to the deployment share without any problems now.  

Happy Deployments!

Heather Pacan, Product Specialist

Custom MDT properties

$
0
0
There is a relatively new feature in Specops Deploy/OS that has proven to solve some interesting challenges. There have been a few posts related to the feature showing examples of how it can be used. You can find the existing posts by following the below links.

The power of this feature is really only limited by your creativity.

What is it?

A Custom MDT Property allows you to further customize your deployments so that you deliver a fully configured and appropriate image to the right users and computers in your organization. Specops Deploy/OS has always done a great job of abstracting the complex, and often times convoluted, parts of the underlying technology; and it has done it again. The Microsoft Deployment Toolkit is very powerful but it is not super intuitive or simple. Specops Deploy/OS is here to make your lives a bit easier.

With that said, there is a good reference to what Custom MDT Properties are available in the MDT documentation. If you have the MDT 2013 docs, look for a document called Toolkit Reference. This document has a section on Properties that outlines, in excruciating detail, the properties that can be managed. 

What is happening under the covers during deployments is a script is running and executing what are called task sequences. The script (or scripts) references properties are available by default, or explicitly referenced by the administrator (that means you!).

In the above link to the example on screen resolution, you can see how the default behavior is not the preferred behavior. By using custom properties you can tell the system how you want it. And in the end that makes your life easier and allows you to get more control over the configurations you support.

How do I use them?


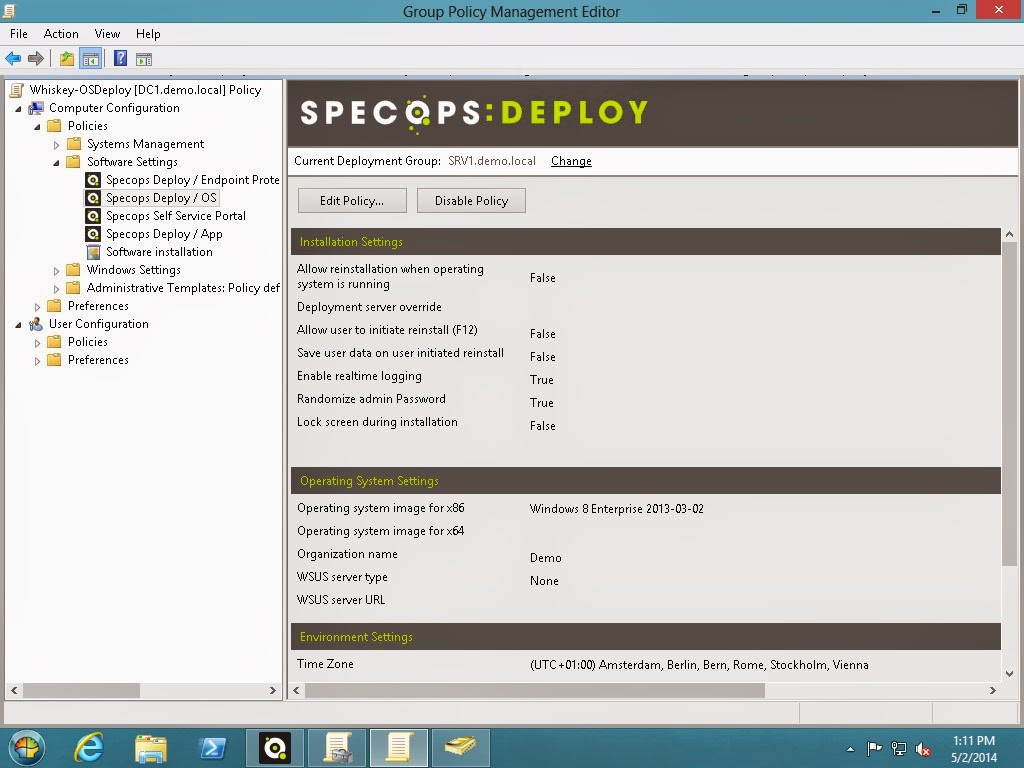
As with most Specops solutions, it doesn’t get much simpler. As you are aware Specops Deploy/OS is configured as a part of Group Policy. On a per Group Policy basis you can set Custom Properties to meet the needs of the target users or computers.

1. Open the Group Policy Editor for your Specops Deploy GPO and navigate to Specops Deploy/OS.


2. Select Edit Policy… on the right hand pane of the Group Policy Object Editor.
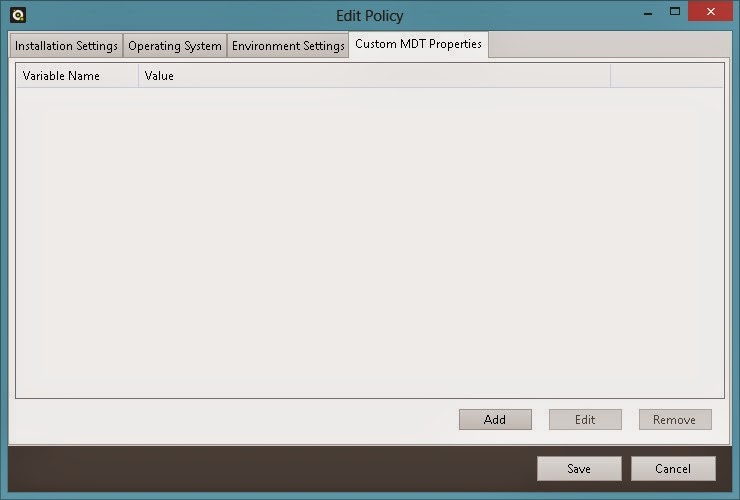
3. Navigate to the Custom MDT Properties tab.


4. Click Add.
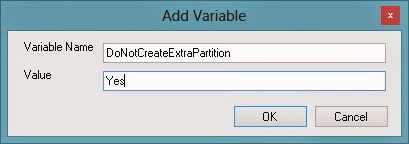
5. Provide the Variable Name and the Value.


6. Click Save.

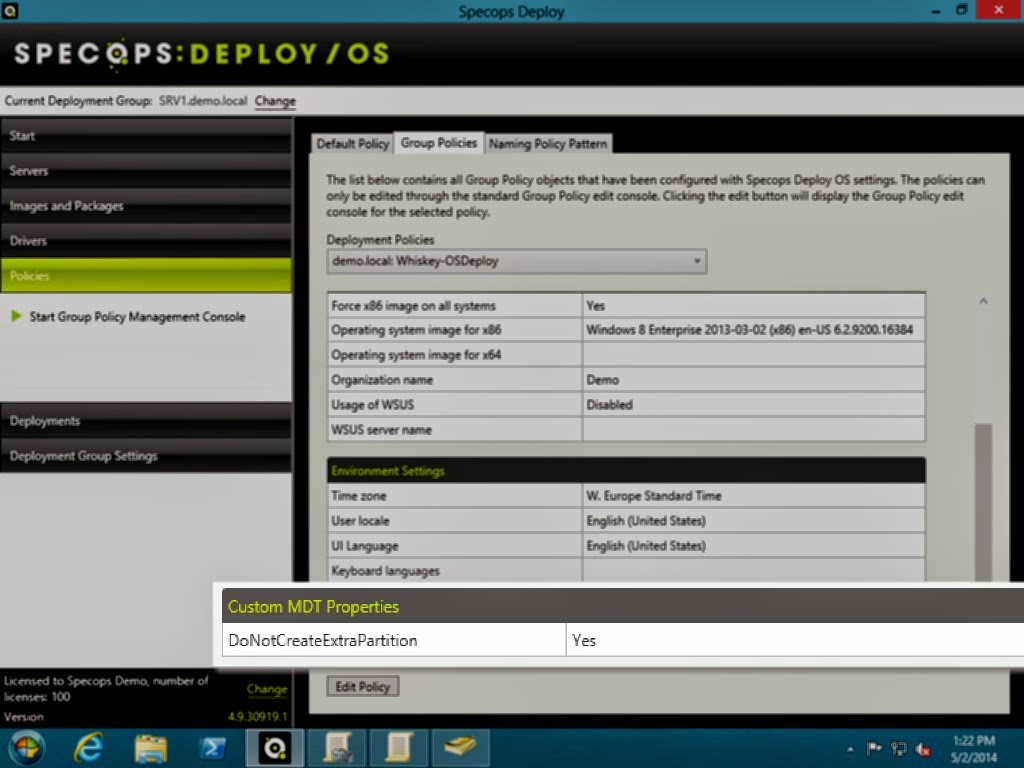
Every computer receiving the OS image from this Group Policy Object will be affected by the new custom attribute. In your operational environment you may have multiple images, multiple Group Policy Objects and possibly many custom attributes that you manage. In the Specops Deploy/OS Administrative Console, if you select the ‘Policies’ tab, you will see an overview of GPOs in your environment configuring Specops Deploy/OS. Select the GPO you are working on and you will see any Custom MDT Properties configured.


Summary


Custom MDT Properties are another powerful way to ensure you are delivering a fully customized and configured experience to your organization. This increases productivity and decreases the support calls you receive from end-users who have systems that are not configured in a way that best represents the work they perform. There are a few hundred custom properties available. If you want to tweak your reference image, take a look at the MDT document called the Toolkit Reference and begin to browse through the available properties. Don’t worry if the doc looks too complex, simply find the property and apply it easily with Specops Deploy/OS.


Kevin Sullivan, Director of Sales Engineering
No admin tools? What to do?

$
0
0
The Specops Product Services team meets a few times a week to discuss various topics. Often times we discuss experiences or requests or needs of current customers we are working with. Recently a scenario was brought up related to managing a Specops Deploy/OS environment with no admin tools. This happened at the same time that we were going through the automation capabilities of the product. And synergy happened!


Scenario

An IT guy is running around performing magic. He is at remote sites, he has a laptop, a cell phone, random machines he can log into. Typical day in the life.
An issue arises where it is clear that he needs to reinstall a computer. Specops Deploy /OS to the rescue! But wait, no admin tools, no ADUC, no Specops tools, nothing to work with. This is a simple task, but you still depend on your toolbox.


PowerShell to the rescue!

First things first, if you have not learned the basics of PowerShell, get started! What you can accomplish is simply is amazing. There is a learning curve but it is well worth it. Visit the Microsoft Virtual Academy and take some free classes, read up on Technet, do some Virtual labs. Take a look at PowerShell.org and see for yourself how active the community is. IT is fun.


Background

PowerShell has revised a few times since it first came out and is current on v4 and continuing to evolve. Use the latest. There are two ways to get additional capabilities into PowerShell. These capabilities are exposed as PowerShell cmdlets (pronounced ‘command-lets). The old way is called a PSSnapIn. This follows a conceptual model we are used to with the Microsoft Management Console (MMC). The newer model is called a PowerShell Module. Either way, the console you are working on, or the script you are running must be aware of the Modules or SnapIns that are available. It is outside of the scope of this post but do read up on this stuff.


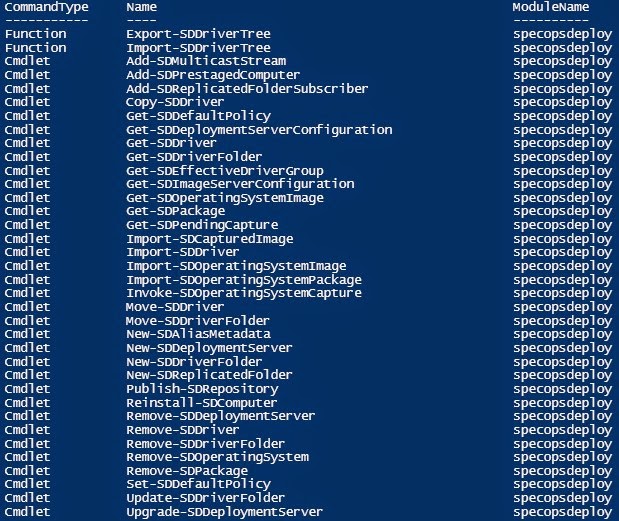
Specops Deploy / OS provides a Module with more than 30 cmdlets and a couple of functions. 
These Modules are exposed to PowerShell where the admin tools are installed. So… how does this help our IT guy you ask? Well, PowerShell remoting is one way.


PSSessions

From any console you can create and enter a remote session with another machine. It is now as if you were sitting at the remote machine and executing commands. Here is a simple example.

If I run PS> Get-Process –Name *spec* from my client the return I get looks like this;

A single process for Specops EndPoint Protection.

If I enter a PSSession on my server and run the same command it looks like this;
Notice the Enter-PSSession cmdlet. It creates the session and the new prompt is the name of the remote host, [srv1] in my example. Type Exit to leave the session.

Now you are at the console remotely running commands and to ensure the Specops Deploy / OS module is available you can run Get-Module –ListAvailable to see what is available on the machine. You can Import-Module if it is not there.

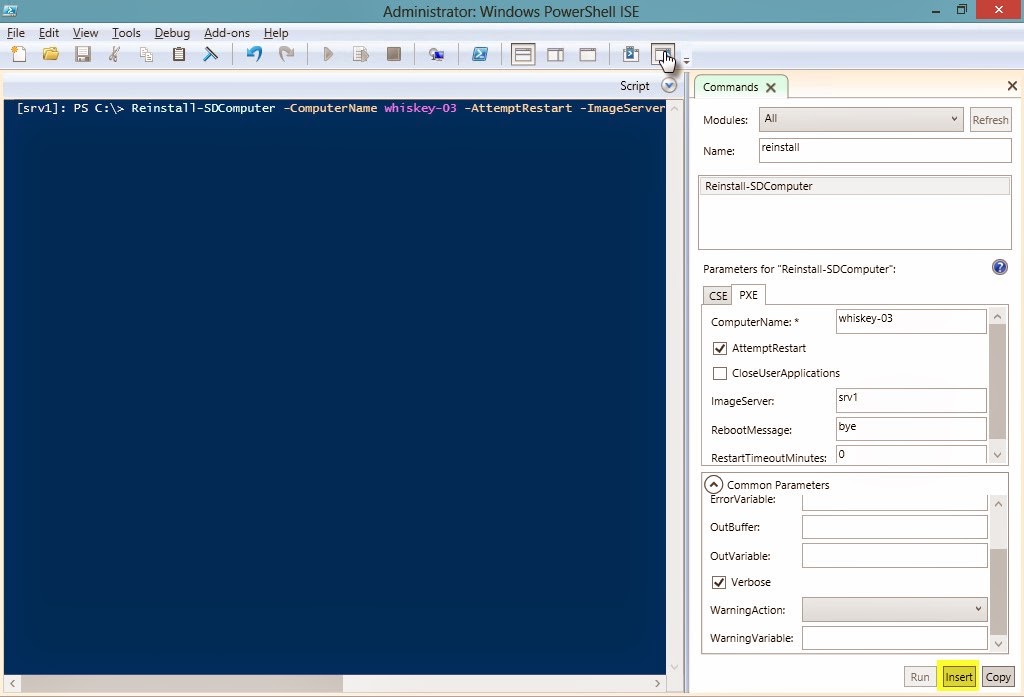
Another tip to share. If you are not aware of the syntax of a specific cmdlet don’t forget about the ‘commands’ window in the PowerShell ISE. This can be super helpful. Click the button on the top right to show the command window.
Search for your command and you will see tabs at the bottom representing the parameters that are available in the different parameter sets. With this example we are going to PXE boot the remote computer and re-install the machine from scratch. Fill out the information you know and click the ‘insert’ button in the bottom of the command window to push the full cmdlet into the console.

Hit enter and the remote server executes the command.


Summary

Specops solutions come with some key PowerShell cmdlets. Learning these cmdlets in conjunction with other available PowerShell commands can extend your administrative reach.

In the above example an IT admin is at a machine without the Specops admin tools available and he needs to initiate a re-installation of a machine. Simple, quick, and with all the benefits of Specops Deploy/OS.

Specops USB Boot Solution

$
0
0
Last week I was helping a customer who has a small branch office without its own server. When they wanted to reinstall a computer, they used to bring the computer to the head office because of the poor broadband connection between the offices.

The problem was solved with a cheap network attached storage (NAS) and a little creativity, which resulted in the Specops USB Boot Solution. This guide describes how you can easily create a bootable USB memory stick with the company’s WinPe configured to deploy the right image from a local NAS instead of deploying it over the company’s site-to-site VPN.

Mikael Ingelin, Product Specialist


Scheduling a Lab Refresh

$
0
0
You manage Lab machines and want to ensure that they’re rebuilt on a regular basis. Applying a fresh image can benefit you in many ways; lowers support costs, ensures consistency, and sets up learning environments for success. Whatever the reason, if the process is simple and repeatable, you will benefit.

Recently, in a discussion with Specops Deploy / OS administrators, this scenario has come up. The process to create a ‘set-it-and-forget-it’ environments is simple, yet very interesting.

Step 1 – preparations and assumptions

To provide simple guidance, we must start with a few assumptions. 
  1. Specops Deploy / OS is setup
  2. Policy is applied to computers
  3. Machines are domain joined and turned on
  4. You have access to the machine where the administration tools are installed

Step 2 – get computer names

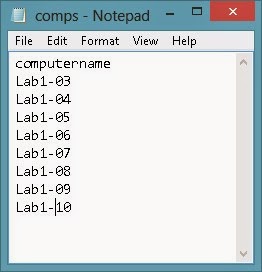
There are many ways to get the computer names of the lab machines. One way is to create a CSV that contains a list of the computer names. The column header in the file must say ‘computernames’. Each line should contain the name of a computer in the lab you intend to refresh. Once you have the .csv file, you can use the ‘Import-CSV’ cmdlet to get those names into the PowerShell pipeline.


Another way to get the names of the lab computers is to use one of the AD cmdlets. You can use the Get-ADComputer cmdlet and provide a filter to return only those computers that are lab machines to be refreshed. 

The problem with the Get-ADComputer cmdlet is that it returns data that isn’t quite compatible with target cmldet and the conversion requires a bit more PowerShell than we want to deal with today. In this example, we will use the CSV and we will pipe that into our next cmdlet.

Step 3 – build script

We will use a small and relatively basic script for this scenario that highlights some interesting PowerShell concepts, and provides an opportunity to discuss some PowerShell basics.

This script will take the computer names from the CSV and use them to target the Reinstall-SDComputer cmdlet. Reinstall-SDComputer is provided as part of the Specops Deploy / OS Admin Tools. The module ‘specopsdeploy’ contains this cmdlet, along with other cmdlets, and must be present on the machine where the script runs.

I like to use the PowerShell ISE which allows you to easily develop your script while you test the syntax of particular cmdlets in the console. You can also use all the help functionality built into the ISE such as the color-coded script editor and console, copy/paste functionality, intellisense and the ‘Commands’ window.

Enter Show-Command in the console and the command window will display. You can also anchor it to the side of the ISE if you have the space for it. Enter ‘Reinstall’ into the ‘Name’ field and select ‘Reinstall-SDComputer’.


Select the PXE tab and enter the information you have. Once complete, click copy at the bottom of the screen. Paste the command into the script window of the ISE.


The above example has a bit more going on but it demonstrates the point here.

At the beginning of the script we use ‘Import-CSV’ cmdlet to grab the computer names out of the file you created. Those will be piped directly into the ‘Reinstall-SDComputer’ cmdlet. The | character is the pipe. It will take the objects in the PowerShell pipeline one at a time and feed them to the ‘Reinstall-SDComputer’ cmdlet.

The script looks like this and should be saved as a .ps1 file.

Step 4 - create scheduled task

There are many settings you can configure in the schedule task. Below are some of the basics that are important to cover:
  1. PowerShell.exe is the action being scheduled
  2. The -Command switch of Powershell.Exe points to the .ps1 file created above, and the .ps1 file points to the .csv that has your list of computers 
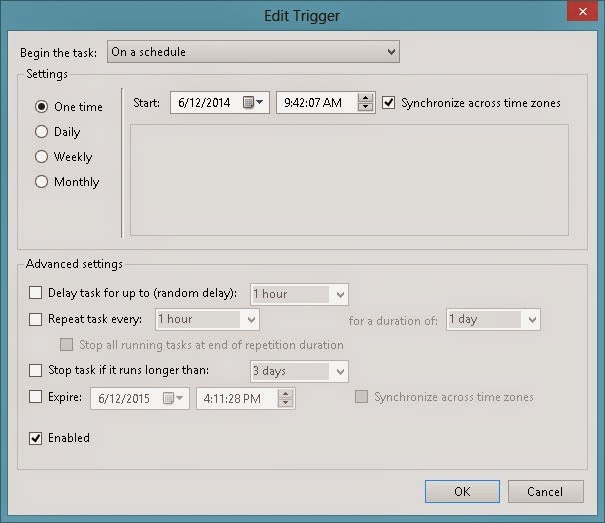
  3. Trigger (schedule) must be 'enabled'
  4. Set your schedule to meet your intent (for example ‘second Friday of the month at 10:00PM)

Summary

Specops Deploy / OS provides the functionality IT administrators need to simply manage their OS deployments. Providing capabilities as PowerShell cmdlets allows administrators to think beyond the UI and come up with creative ways to use the technology to meet their business needs. Scheduling the refresh of labs is a great example of extending the capabilities into an automated solution.


Kevin Sullivan, Director of Sales Engineering

Configuring Chrome and Firefox for Windows Integrated Authentication

$
0
0
Windows Integrated Authentication allows a users' Active Directory credentials to pass through their browser to a web server. Windows Integrated Authentication is enabled by default for Internet Explorer but not Google Chrome or Mozilla Firefox. Users who use the non-Microsoft browsers will receive a pop-up box to enter their Active Directory credentials before continuing to the website. This adds additional steps and complexity for users who are using web based applications. In an effort to make this process as easy as possible for end-users, many IT administrators enable Windows Integrated Authentication for the third party browsers. This can be done with Chrome and Firefox with a few additional steps. This article will show you how to enable Windows Integrated Authentication for Google Chrome and Mozilla Firefox.

Configuring Delegated Security for Mozilla Firefox
To configure Firefox to use Windows Integrated Authentication:
1. Open Firefox.
2. In the address bar type about:config

3. You will receive a security warning. To continue, click I’ll be careful, I promise
4. You will see a list of preferences listed. Find the settings below by browsing through the list or searching for them in the search box. Once you have located each setting, update the value to the following:   

Setting
Value **
network.negotiate-auth.delegation-uris
MyIISServer.domain.com
network.automatic-ntlm-auth.trusted-uris
MyIISServer.domain.com
network.automatic-ntlm-auth.allow-proxies
True
network.negotiate-auth.allow-proxies
True

** MyIISServer.domain.com should be the fully qualified name of your IIS server that you are setting up the Windows Integrated Authentication too.
Negotiate authentication is not supported in versions of Firefox prior to 2006.


Configuring Delegated Security in Google Chrome
You can use three methods to enable Chrome to use Windows Integrated Authentication.Your options are the command line, editing the registry, or using ADMX templates through group policy. If you choose to use the command line or edit the registry, you could use Group Policy Preferences to distribute those changes on a broader scale. Below are the steps for the three methods:

To use the command line to configure Google Chrome:
Start Chrome with the following command:

Chrome.exe --auth-server-whitelist="MYIISSERVER.DOMAIN.COM" --auth-negotiate-delegatewhitelist="MYIISSERVER.DOMAIN.COM" --auth-schemes="digest,ntlm,negotiate"


To modify the registry to configure Google Chrome:
Configure the following registry settings with the corresponding values:
Registry                               
AuthSchemes                           
Data type: String (REG_SZ)
Windows registry location: Software\Policies\Google\Chrome\AuthSchemes
Mac/Linux preference name: AuthSchemes
Supported on: Google Chrome (Linux, Mac, Windows) since version 9
Supported features:Dynamic Policy Refresh: No, Per Profile: No
Description: Specifies which HTTP Authentication schemes are supported by Google Chrome. Possible values are 'basic', 'digest', 'ntlm' and 'negotiate'. Separate multiple values with commas. If this policy is left not set, all four schemes will be used.
Value:"basic,digest,ntlm,negotiate"

AuthServerWhitelist                  
Data type: String (REG_SZ)
Windows registry locationSoftware\Policies\Google\Chrome\AuthServerWhitelist
Mac/Linux preference name: AuthServerWhitelist
Supported on: Google Chrome (Linux, Mac, Windows) since version 9
Supported features: Dynamic Policy Refresh: No, Per Profile: No
Description: Specifies which servers should be whitelisted for integrated authentication. Integrated authentication is only enabled when Google Chrome receives an authentication challenge from a proxy or from a server which is in this permitted list. Separate multiple server names with commas. Wildcards (*) are allowed. If you leave this policy not set Chrome will try to detect if a server is on the Intranet and only then will it respond to IWA requests. If a server is detected as Internet then IWA requests from it will be ignored by Chrome.
Value:"MYIISSERVER.DOMAIN.COM"

AuthNegotiateDelegateWhitelist 
Data type: String (REG_SZ)
Windows registry locationSoftware\Policies\Google\Chrome\AuthNegotiateDelegateWhitelist
Mac/Linux preference name: AuthNegotiateDelegateWhitelist
Supported on: Google Chrome (Linux, Mac, Windows) since version 9
Supported features: Dynamic Policy Refresh: No, Per Profile: No
Description: Servers that Google Chrome may delegate to. Separate multiple server names with commas. Wildcards (*) are allowed. If you leave this policy not set Chrome will not delegate user credentials even if a server is detected as Intranet.
Example Value: ”MYIISSERVER.DOMAIN.COM”

To use ADM/ADMX templates through Group Policy to configure Google Chrome:
1.       Download Zip file of ADM/ADMX templates and documentation from: http://www.chromium.org/administrators/policy-templates.

2.       Add the ADMX template to your central store, if you are using a central store. For more information see the Specops Password Reset Administration Guide.

3. Configure a GPO with your application server DNS host name with Kerberos Delegation Server Whitelistand Authentication Server Whitelistenabled.

Each of these three methods achieve the same results for configuring Google Chrome for Windows Integrated Authentication. The method that is best for you will depend on how your organization is set up.  Personally, I would use the command line or the registry if you are deploying across an enterprise. You can easily distribute a shortcut on the user’s desktop with the command and distribute that with Group Policy preferences. If you choose to use the registry method, that is able to be distributed with Group Policy. 

With a variety of third-party browsers available, many users will receive a pop-up box to enter their Active Directory credentials before continuing to an IIS hosted web application. This leads to additional steps, complexity and confusion for many end-users. By setting up Windows Integrated Authentication into Chrome and Firefox, you will be able to give your users the greatest amount of flexibility for their choice of browser as well as ease of use with your web-based applications.   

Kevin Sullivan, Director of Sales Engineering

Gpupdate Prof: Read Remote Registry

$
0
0
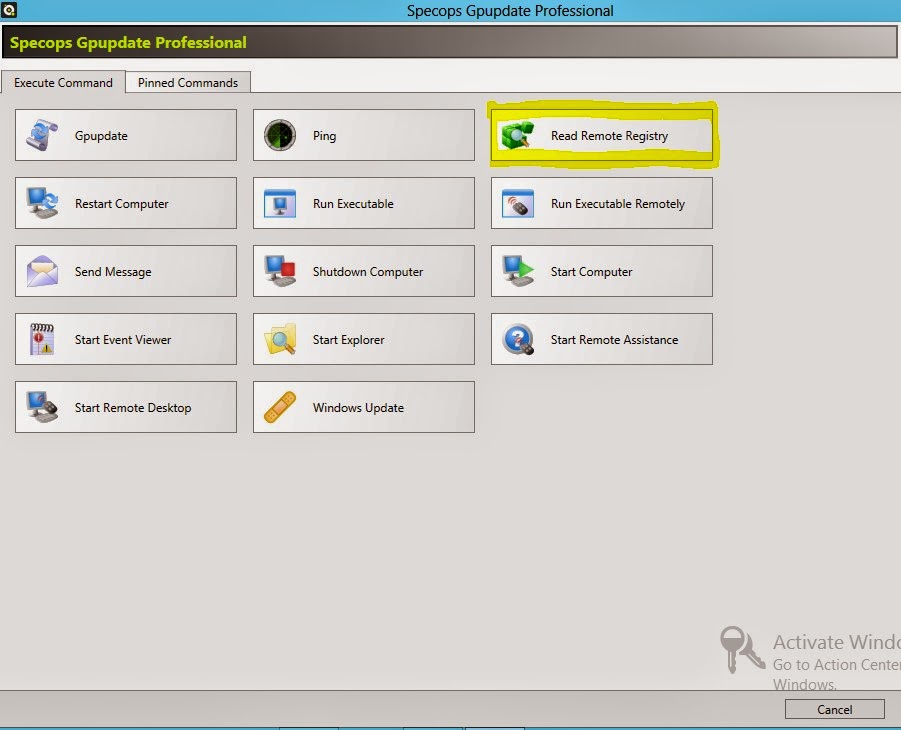
Gpupdate Professional is a remote management tool that allows a desktop administrator to manage his or her desktop environment from a single location. You essentially get a remote administration center for your client machines through a menu extension in Active Directory Users and Computers. I have been working on a series of blog posts highlighting some of the commands and practical uses for them in your environments. If you haven’t read my articles on the Remote Assistance command or Start Explorer and Run Remote Executablecommands, please take a look. I am continuing the series with the Read Remote Registry Command.  This command allows you to read a registry value on a remote machine(s). 


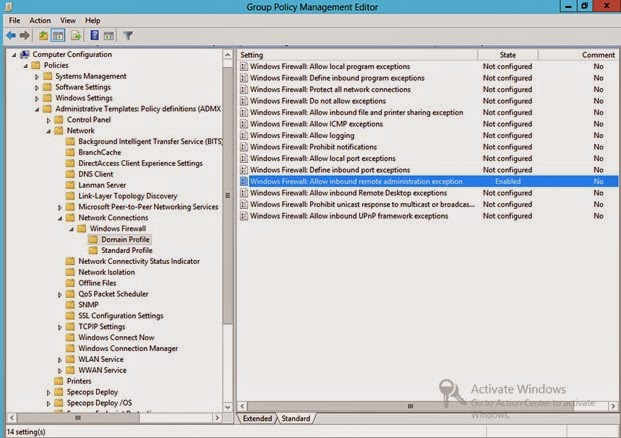
To use this command you will need to make sure the Remote Administration Exception is enabled in the windows firewall and the Remote Registry service is started. The Remote Administration Exception can be enabled by running the following from a command prompt:

 netsh firewall set service type = remoteadmin mode = mode

You can also enable the Remote Administration Exception through group policy:


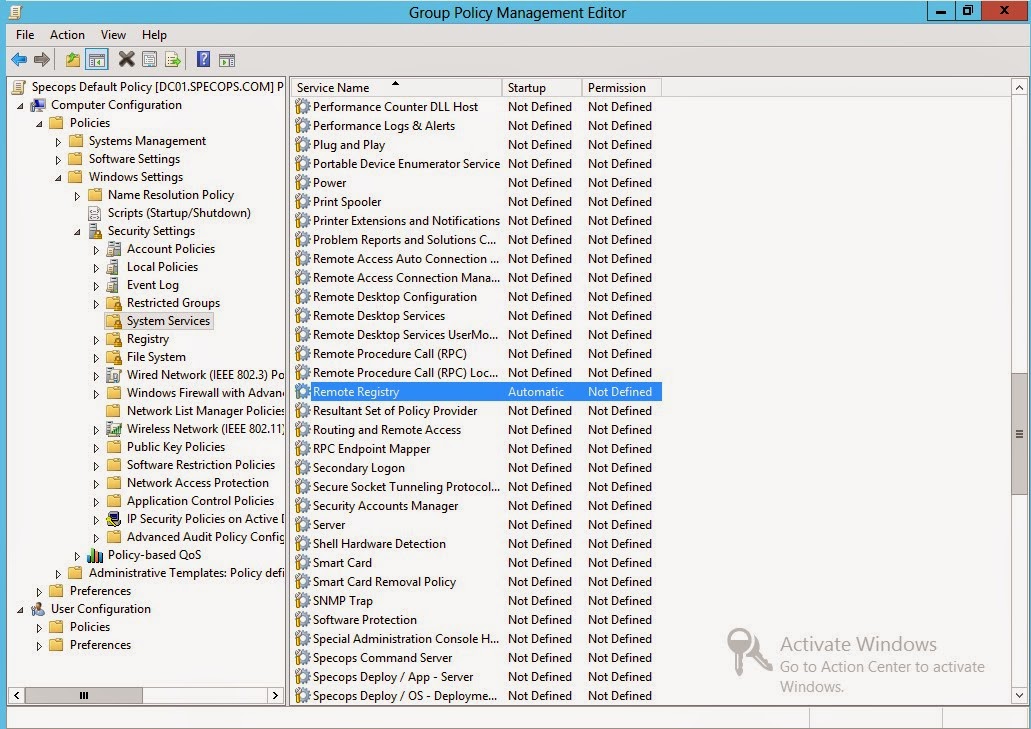
The Remote Registryservice can also be started through Group Policy:


For an example of how to use the Read Remote Registry command, I would like to be able to see which versions of Internet Explorer my client computers are running.  That information is located in the registry on the client machines at:

HKEY_LOCAL_MACHINE\SOFTWARE\Microsoft\Internet Explorer\Version

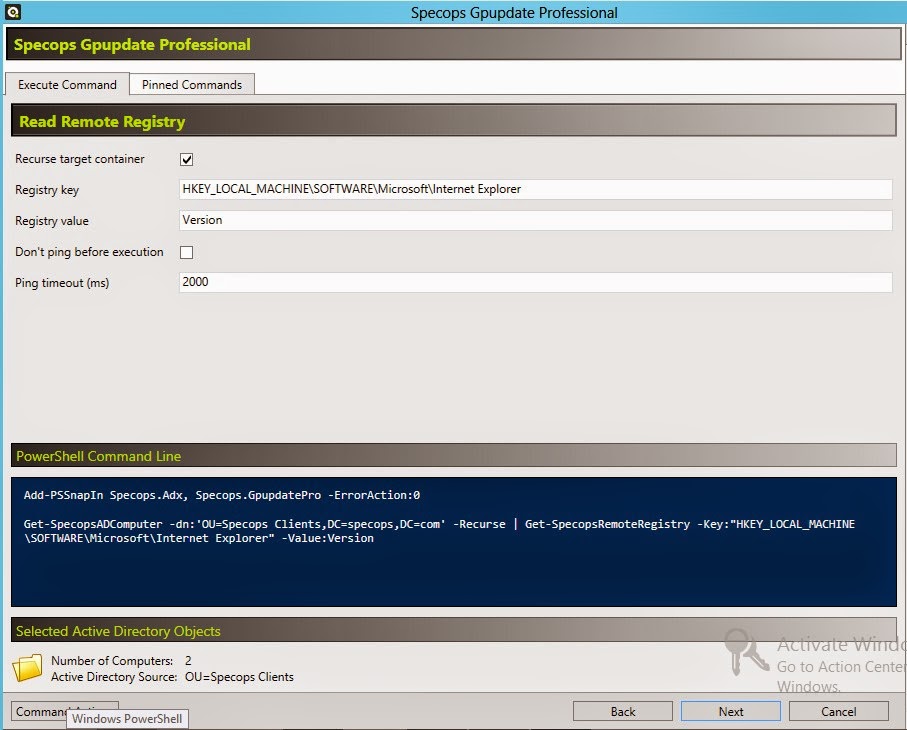
To run the command against all of the computers in a particular OU, you will need to launch Gpupdate Professional on the OU in Active Directory Users and Computers.
  1. Locate the OU in Active Directory Users and Computers that you want to retrieve the registry information from.
  2. Right click on the OU.
  3. Select Specops Gpupdate Professional
  4. Select Read Remote Registry
  5. Type in the full path of the registry key for the value that you are looking for.
  6. Fill in the name of the registry value that you are looking for.
  7. If you want to search all of the sub-OUs select Recurse Target Container
  8. Click Next
  9. Click Execute


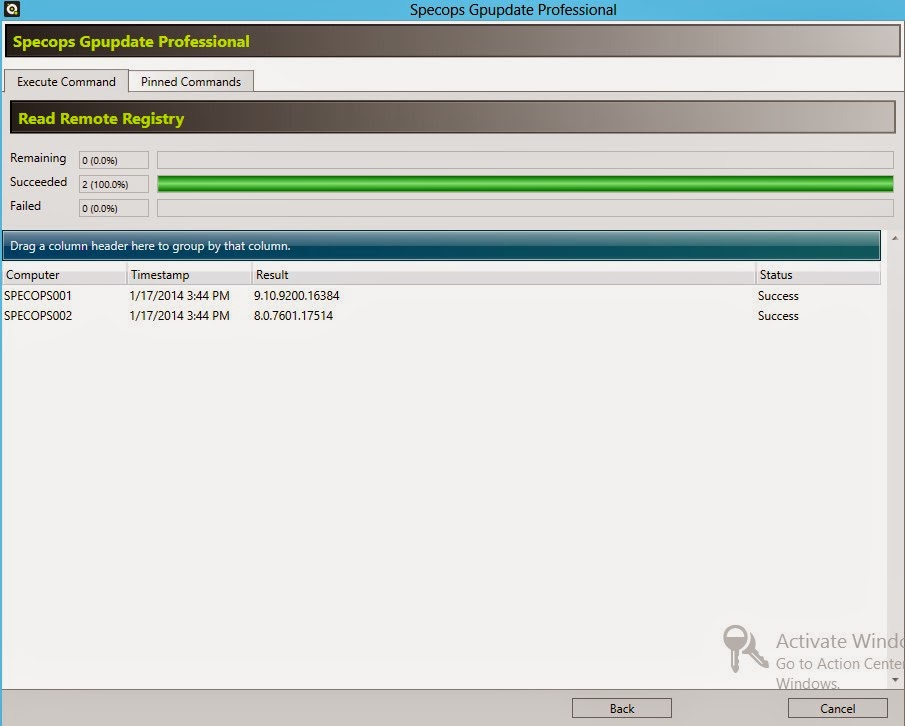
You will then see the results displayed in the Gpupdate Professional display window.


Read Remote Registryis a quick and simple remote way a desktop administrators can gather a piece of information about their client machines. My example is only one of many ways this command could be used if you are not using an inventory reporting tool such as Specops Inventory. When troubleshooting remotely, this type of information could be valuable to lead to the resolution of your customer’s support problem. Gpupdate Professional puts you in control of your client machines with a few clicks of the mouse.  Stay tuned for the next article in my series on Gpupdate Professional!

Happy deployments!

Heather Pacan, Product Specialist


Multiple Drives Causes a Deployment Error

$
0
0
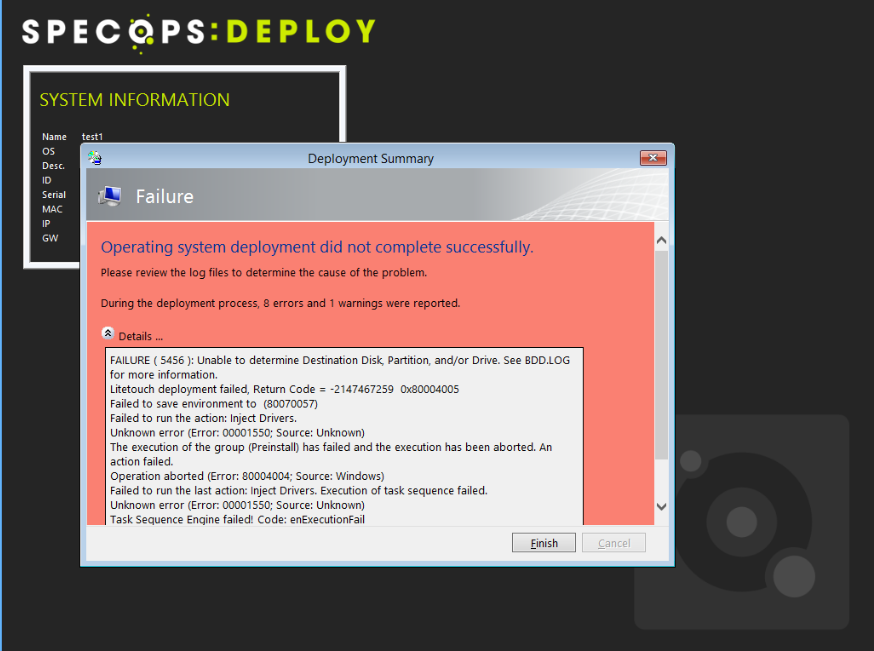
My colleague Johan had lent his tablet to Mikael, another fellow Product Specialist, to evaluate for a few days.  When Mikael started to deploy Windows 8 to the tablet with Specops Deploy, he got the following error:  Failure (5456): Unable to determine the Destination Disk, Partition, and/or Drive


After some searching, they discovered that if you have multiple partitions or disks in a machine, MDT may be unable to determine where to install the operating system.  MDT is one of the base technologies that Specops Deploy/OS uses to deliver the operating systems to client machines.  In this particular situation, an SD card in the tablet was preventing MDT from determining which disk to install the operating system on.  We did some further testing to try to reproduce the error in another environment.  We were able to replicate this situation on a UEFI machine with two disks.  

There is a simple fix to direct MDT to the disk to install the operating system on.  You will need to go into the Deployment Workbench of MDT and add a variable to the task sequence.   To do this, you will need to attach the Deployment Share to your Deployment Repository to make the changes.  In case you are not familiar with using the Deployment Workbench, here are the detailed steps for connecting to the Deployment Repository and applying the fix:

  1. Go into the Microsoft Deployment Toolkit’s Deployment Workbench.
  2. Right click on Deployment Share and select Open Deployment Share.
  3. Browse to your Deployment Repository.
  4. Select OK, then click on Next, Next and then Finish.
  5. Click on Task Sequences.
  6. On the right side of the screen, right click on the image that you are using and select Properties.
  7. Select the Task Sequences tab.
  8. Expand Preinstall.
  9. Expand New Computer Only.
  10. Click on Format and Partition Disk.
  11. On the lower right side of the screen, highlight OSDisk (Primary) and then click partition properties (which is the middle button on the upper right side of the volume box).  Please see the highlights in the illustration below
  12. Type OSDisk into the Variable box in the bottom.
  13. Click OK.
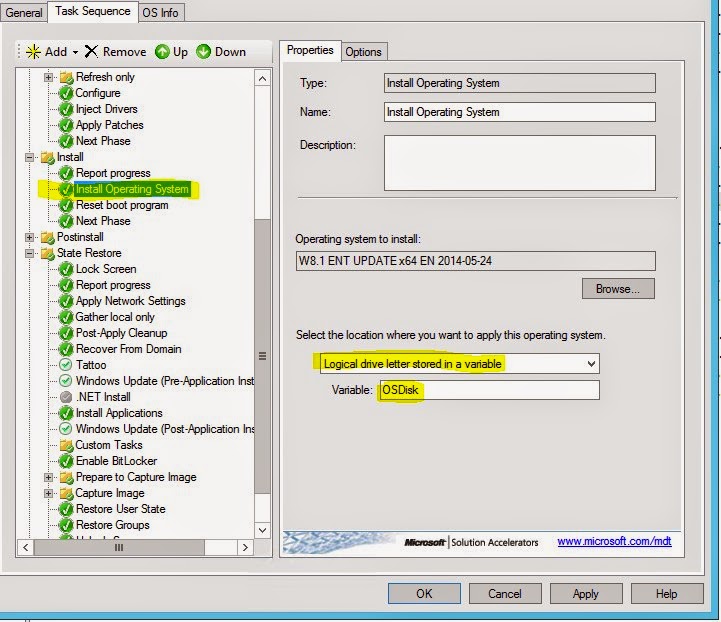
  14. On the Task Sequence tab, expand the Installfolder then select Install Operating System
  15. On the right side under “Select the location where you want to apply the operating system” choose Logical Drive Letter Stored in a Variable from the drop down menu.
  16. Type OSDisk in the variable box.  Select OK.  Please see the illustration below.  


You may exit out of the Deployment Workbench.  Make sure to go into your Specops Deploy/OS Admin console and publish your deployment repository so the changes will be replicated to your deployment shares.  You can also do this by running Publish-SDRepository from an elevate PowerShell prompt.  You can now reboot your client machine and your operating system will install now.

We have discovered that under certain circumstances multiple hard disks or partitions can cause MDT to have an error when it is unsure of where to install the operating system.  The two scenarios that my colleagues and I have tested were a tablet with an SD card inserted into it and a UEFI machine with two hard disks.  There may also be other situations where this happens that we have not come across yet.  By setting up your task sequence in MDT to use the OSDisk variable for the operating system installation location, instead of having it set to a specific disk (which is the default in MDT), you can easily remedy the situation.    


Heather Pacan, Product Specialist

Deleting Orphaned Deployments

$
0
0
This may not be the best title for this post. Deleting Orphaned Deployments may be the solution, but it is surely not the problem. The technique described here is something that you can use in other situations where an XML file is involved. The scenario that drove the writing of this post is, of course, specific to Specops Deploy.


The Problem

A strange crash in the Specops Deploy Application Snap-in: An administrator will open the GPMC, find the desired GPO, open the GPO in the editor, navigate to the Specops Deploy Application snap-in, look at deployments, and suddenly the console crashes. A console crash is rare. This scenario is also rare, and it occurs if an Admin ‘deletes’ a package that is referenced in a deployment. The issue can be resolved, but it introduces a very interesting troubleshooting opportunity: How can you fix the deployment if you can’t look at it in the editor?

Specops Deploy Application stores all of the deployment information in the GPO in SYSVOL. The data is stored in an XML file called ‘Deployments.xml’. If you manually edit this file, and delete the corrupt ‘Deployment,’ you are done. This obviously is not a great move. It is ripe for errors and not a good plan of attack.


The Solution

The solution here, and in reality the solution for many such problems is automation. The idea is to remove the opportunity for errors and create a process where you surgically achieve exactly what you want. Here we will call on PowerShell to help us out. One of my colleagues shared a technique to deal with XML files and it is really great. It is actually quite simple.
  1.  Use the Get-Content cmdlet to retrieve the xml file
  2. Shove that file into a variable that is specifically cast as an XML file
  3. The document is now available as an object that can be manipulated as you need

An Example

Preparation

OK, so here we go. Many assumptions are made here and keep an eye on upcoming posts to walk through additional techniques to help. This post is about the last step, cleaning up an orphaned or corrupt deployment. In my example I have a single GPO with two deployments. Imagine one of these deployments, ‘WinZip 7’, is corrupt.

I have found that this deployment has a unique ID that I will need. I can get this information through PowerShell. Ignore the cmdlets here, they are a topic for other posts. But I use the Specops Deploy Application cmdlets to get the information I need.

Specops Deploy Application - Packages
The deployment has important data that I will need, and the GPO itself has some important information as well.

 Specops Deploy Application - Deployment

Specops Deploy Application – GPO
Now, I have all the information I need to find and correct my issue.


Execution

Now to the real meat of the solution. The Get-Content cmdlet will be the way we get to this information. We will throw the file into a variable that we can manipulate. Here is the command without references to my specific test environment and test GPO.
PS C:\> [XML]$x = Get-Content “\\dc1\SYSVOL\<domainName>\ Policies\<GUID of GPO>\Machine\SpecopsDeploy\Deployments.xml”

Execute the above command then take a look at $x. It is an object ready to be used.
NOTE: Use the PowerShell ISE. The ISE provides a lot of additional capabilities that will help navigate, learn and execute on some of the tasks you are attempting. The Intellisense capability of the ISE is worth the price of admission. Once you learn how to leverage it you won’t be able to live without it.

If you type $x. on the command line you will see a list of all of the properties and methods that can be called on here.

If you choose Deployments and add ‘.’ you will see additional properties/methods.

If you play around with this technique you will begin to see how valuable this can be. For this example you want to look at $x.deployments.deployment.

For this GPO there are only the two ‘Deployments’. We only want the one for ‘WinZip 7’. This takes us back to where we found the deployment ID, Package ID etc. In this case we will only need the PackageID attribute associated with ‘WinZip 7’.  

It is all coming together. At this point we have the ‘Deployments.xml’ file in the $x variable. We know the ‘Deployment ID’ is the GUID in the above image. We will create another variable to point to that specific Deployment.

This is a bit of a leap so let’s make sure we are all on the same page.
  1.  Deployments.xml file is stored in a variable, $x
  2. The specific deployment we are targeting is stored in a variable, $s
  3.  The XML object has a method called ‘RemoveChild’that takes the GUID of the child element to delete. We pass that to the ‘RemoveChild’ method by way of the $s variable.
  4. Then we call the ‘save’ method on $x


Done! Now if I look at Get-SDDeployment ‘WinZip 7’ is gone. 

I can now open the GPO and navigate to Specops Deploy Application and my corrupt GPO is no longer a problem.

Stay tuned for more PowerShell related posts.

Kevin Sullivan, Director of Sales Engineering

Orphaned Deployments

$
0
0

Orphaned Deployments

I have been known to say “Group Policy comes without a This may be a career limiting configuration change you are about to make, are you sure!? message.” You can do a lot of things with GP that can cause a ripple effect that you are not prepared for so always be careful, test, then re-test.

With that said, it is also a very predictable system and at Specops we continue to leverage that great predictable system with our solutions.

Recently a Specops Deploy Customer un-linked their SD/Application GPO from an OU. What happens in this scenario?


Managed vs. Orphaned

When an administrator adds a package to their Specops Deploy App GPO they configure that package to behave a certain way. The configured behavior is mostly related to pre-install commands, post-install commands, uninstall behavior and more. The package by itself does not do anything. In order to get a package to a user/computer you create a deployment.

A Deployment can be configured to define additional behavior related to the actual installation of the package. For example an administrator can configure a deployment to ‘Uninstall the package if the deployment falls “Out of the Scope of Management.”’

When a deployment is targeting a computer those deployment(s) will be enacted on that computer and the packages in those deployments will be installed. The deployments will be referenced as ‘Managed Deployments’.

SD Administrators can take a look at managed deployments on client systems in a few different ways. I like to use PowerShell.

PS C:\> Get-Item ‘HKLM:\SOFTWARE\Specopssoft\Specops Deploy\Client Side Extension\Managed Deployments\System\*’

The above PowerShell command will display all managed deployments on that client for you to review.

If a managed deployment disappears, an administrator deletes a link, a user can’t process the GPO due to a group membership change, or any other reason, the deployment may go to ‘Orphaned Deployments’.

PS C:\> Get-Item ‘HKLM:\SOFTWARE\Specopssoft\Specops Deploy\Client Side Extension\Orphaned Deployments\System\*’

This means that there is software still on the client system that is no longer managed by the Specops Deploy Application.

This most likely does not cause an issue for administrators, but if mistakes are made, and GPOs are unlinked and deployments are orphaned, when the problem is resolved those applications may want to re-install themselves. That may not be great.


How to Recover From a Mistake

There is a simple way to resolve the issue if an Administrator mistakenly unlinks a GPO. The Managed vs. Orphaned deployments are stored in the Registry on the client as you can see from the above PowerShell commands. Now they just have to move. So, instead of ‘Get-Item’ we can use ‘Move-Item’.

PS C:> Move-Item ‘HKLM:\SOFTWARE\Specopssoft\Specops Deploy\Client Side Extension\Orphaned Deployments\System\*’ –Destination ‘HKLM:\SOFTWARE\Specopssoft\Specops Deploy\client Side Extension\Managed Deployments\System’

Relink the GPO and you should be good to go. As with everything make sure you test out this procedure in a lab. PowerShell is incredibly powerful so be careful. Fat fingers count.


Challenge


Want to take this to a new level? Get computer names from a text file or from AD itself and run move-item from that list. Some complex scenarios can be solved simply if you take the time to learn the PowerShell option.

Kevin Sullivan, Director of Sales Engineering
Troubleshooting Group Policy events

$
0
0

Walking through the basics in troubleshooting anything is a good process to follow. In a previous post I talked about the four areas where you should start your Group Policy troubleshooting:

  • Install state of Client Side Extension (CSE)
  • GPResult
  • Events
  • CSE Registrations

Getting a bit deeper into the Events can be super helpful. This post will provide some guidance to navigating Group Policy related events.

There is a very logical organization to Windows events. Understanding the organization is really helpful when troubleshooting Group Policy issues. In the previous post we mentioned Events with IDs 4016 and 5016. They represent the start of a Client Side Extension (CSE) and the Success Events of those CSEs respectively.

That’s good for a specific example. But what about Group Policy service issues? What about errors? Warnings? Information? The following table is taken from a TechNet article on sorting out Group Policy events. Understanding the high level can really speed up the process of figuring out what is the culprit when something goes awry.

Event ID Range
Description
4000–4007
Group Policy start events: These informational events appear in the event log when an instance of Group Policy processing begins.
4016–4299
Component start events: These informational events appear in the event log when a component of Group Policy processing begins the task described in the event.
5000–5299
Component success events: These informational events appear in the event log when a component of Group Policy processing successfully completes the task described in the event.
5300–5999
Informative events: These informational events appear in the event log during the entire instance of Group Policy processing and provide additional information about the current instance.
6000–6007
Group Policy warning events: These warning events appear in the event log when an instance of Group Policy processing completes with errors.
6017–6299
Component warning events: These warning events appear in the event log when a component of Group Policy processing completes the task described in the event with errors.
6300–6999
Informative warning events: These warning events appear in the event log to provide additional information about possible error conditions with the action described in the event.
7000–7007
Group Policy error events: These error events appear in the event log when the instance of Group Policy processing does not complete.
7017–7299
Component error events: These error events appear in the event log when a component of Group Policy processing does not complete the task described in the event.
7300–7999
Informative error events: These error events appear in the event log to provide additional information about the error condition with the action described in the event.
8000–8007
Group Policy success events: These informational events appear in the event log when the instance of Group Policy completes successfully.

The table by itself can be incredibly helpful. Check out the TechNet article mentioned above. Mastering reading Group Policy events can dramatically speed up your troubleshooting efforts.

Kevin Sullivan, Director of Sales Engineering


P.S.
There is an incredible developer at Microsoft who dedicated many of his years to the Group Policy area. His name is Rajive. Rajive took a weekend a few years back and came up with an incredible tool that every Group Policy administrator should have in their tool belt, Group Policy Log View. (Thanks Rajive!) Make sure to go download this free tool from Microsoft. You can find it here

Capturing and deploying error with IE 10
$
0
0

The Product Services team recently started to get a number of cases with users getting the following error during Capturing or Deploying a captured image that contained Internet Explorer 10:

Error:  "Windows could not parse or process unattend answer file [C:\windows\Panther\unattend.xml] for pass [specialize]. A component or setting specified in the answer file does not exist." 

This one has some of us spinning in circles quite a bit. We were able to deduce that it was something in the “Specialize” section of the unattended.xml, but weren’t sure which part was causing the error. 

After some researching and testing, I found that it was due to Internet Explorer 10. There is a component for Internet Explorer in the unattend.xml put in by MDT by default that is no longer a part of Internet Explorer 10. So, in this particular situation, when you go to create the capture or deploy the capture, the above error pops up. The good news is that even if you get the error after you create your capture you can still use that image. What you have to do is edit the Unattend.xml file on your Specops Deploy server in the following path for that particular captured image.

D:\Specops\Deploy\DeploymentRepository\Control\<GUID>\Unattend.xml
Search and remove the Internet Explorer component from the “Specialize” section which will be similar to this:
<component name="Microsoft-Windows-IE-InternetExplorer" processorArchitecture="amd64" publicKeyToken="31bf3856ad364e35" language="neutral" versionScope="nonSxS" xmlns:wcm="http://schemas.microsoft.com/WMIConfig/2002/State" xmlns:xsi="http://www.w3.org/2001/XMLSchema-instance">
<IEWelcomeMsg>false</IEWelcomeMsg>< /component>


After you save the unattend.xml file you will need to publish your Deployment Repository. You can use that captured image to successfully deploy now. 

Just keep in mind that this may be one of many errors/solutions to a unattend.xml error that is out here. Some good information on this issue I found on Microsoft’s MDT forum was in this article:

Happy Deployments!

Heather Pacan, Product Specialist

Setting up a lab

$
0
0
There are so many good reasons to have a lab available. There are very few reasons to not. IT organizations are constantly testing new releases, configurations, and widgets that need to be rolled out. They need to evaluate software and solutions that they want to implement in a production environment. With Windows 8+ and the latest versions of Hyper-V, there is no good reason to not have a lab to use.

With that said, managing the lab in Hyper-V is very easy and to be honest, quite fun. If you are a VMWare shop, that is great. Either way there are some simple techniques and best practices that can be super helpful.

This video walks through some thoughts and ideas on how to manage your lab, how to setup the core environment, and prepare for testing. We’ll try to follow up with additional content related to evaluating Specops solutions, but first things first…

Enjoy!


Viewing all 75 articles
Browse latest View live